| Version 1 (modified by admin, 14 years ago) (diff) |
|---|
Installing Eclipse for C/C++
These are some step-by-step instructions on how to setup Eclipse for compiling C/C++ programs. If you prefer to use Visual Studio or any other IDE, you can simply ignore them :-) .
Depending on your operating system and Eclipse configuration there are multiple steps necessary to succeed.
By default, Eclipse will use the C/C++ GNU development tools to compile, link, and debug your programs. If you are running Linux and MacOS you shouldn't have a problem, as long as you have gcc, make, and gdb installed.
Under Windows, you have to install the GNU development tools, but fortunately there is an Eclipse extension called "Wascana" that takes care of that. See below for detailed instructions on how to acquire it. If you develop under Linux or MacOS, just skip the instructions on installing "Wascana".
If you already have Eclipse for Java installed and want to add the C/C++ functionality, please start reading here. If you prefer a new Eclipse installation, start reading here.
If you encounter any problems, please send me an e-mail ( rpillat@… ) or see me during my office hours.
If you already have Eclipse for Java installed
- If Eclipse is installed somewhere in your user folder, simply launch the executable. Otherwise, make sure to right-click the executable and select "Run as administrator" (you will need write access to the Eclipse folder to install the new plugins).
- Once the workspace opens, select "Help -> Install new software"
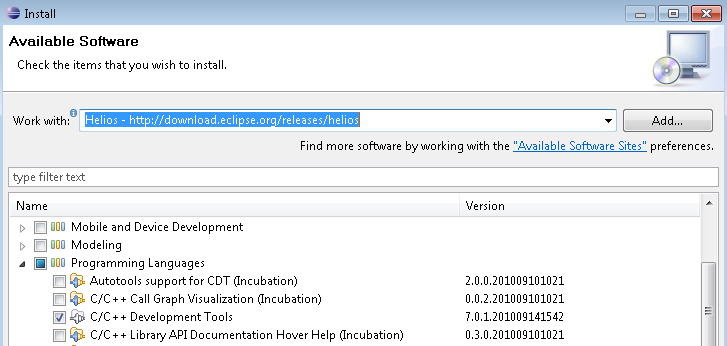
- A new window opens. In the "Work with:" combobox, select the "Helios" repository.
- There will be a list of available packages. You are only interested in the "Programming Languages -> C/C++ Development Tools" software. Select the checkbox in front of it
- Now hit the "Next" button, accept the license terms and click "Finish".
- Eclipse will ask you to restart, so please do so.
- Now we have to install one more package. Once the workspace opens, select "Help -> Install new software" (for the second time ;-) )
- In the upper-right corner click the "Add" button.
- In the new "Add repository" window, enter "Wascana" under "Name" and "http://svn.codespot.com/a/eclipselabs.org/wascana/repo" under "Location". Click the OK button.
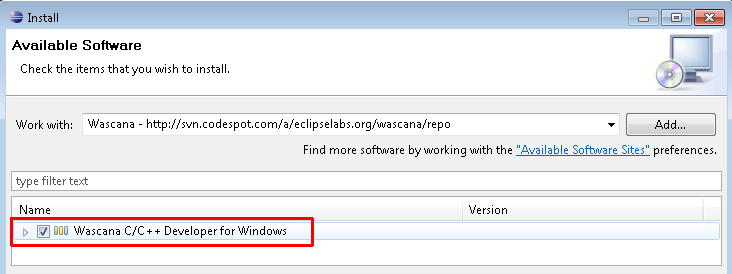
- Eclipse will now add "Wascana C/C++ Developer for Windows" to the list of available software. Mark the checkbox in front of that.
- Now hit the "Next" button twice, accept the license terms and click "Finish".
- Eclipse will ask you to restart, so please do so.
- Read on if you want to know how to create a new C/C++ project
If you prefer a new Eclipse installation
- Download "Eclipse IDE for C/C++ Developers" from http://www.eclipse.org/downloads/
- Unzip the archive somewhere in your user folder.
- Start Eclipse.
- Once the workspace opens, select "Help -> Install new software"
- A new window opens. In the upper-right corner click the "Add" button.
- In the new "Add repository" window, enter "Wascana" under "Name" and "http://svn.codespot.com/a/eclipselabs.org/wascana/repo" under "Location". Click the OK button.
- Eclipse will now add "Wascana C/C++ Developer for Windows" to the list of available software. Mark the checkbox in front of that.
- Now hit the "Next" button twice, accept the license terms and click "Finish".
- Eclipse will ask you to restart, so please do so.
- Read on if you want to know how to create a new C/C++ project
Creating a new C/C++ project
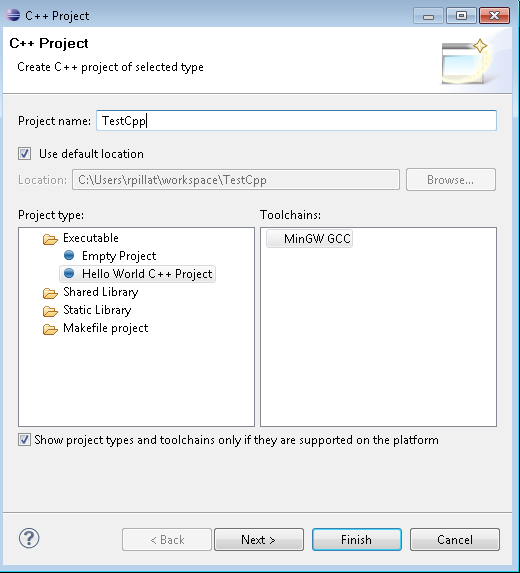
- From the menu select "File -> New -> C++ Project" (or "C Project" if you prefer). If these options don't show up, try to find them under "File -> New -> Other -> C/C++". A wizard for a new project will open. Enter an appropriate name and select "Hello World C++ project".
- Click "Finish" and you are the proud author of a C++ HelloWorld project. It's a simple project that only prints out a greeting to the console when you run it.
- To build the project click the hammer symbol, to run it the play button, and to debug it the little bug.
Attachments (5)
- build_debug_run.png (2.2 KB) - added by admin 14 years ago.
- eclipse_cdt_install.png (20.2 KB) - added by admin 14 years ago.
- new_cpp_project.png (18.3 KB) - added by admin 14 years ago.
- wascana_install.png (18.0 KB) - added by admin 14 years ago.
- wascana_install_2.png (13.8 KB) - added by admin 14 years ago.
Download all attachments as: .zip


